In this blog, I will show how we can use Patch function to create or modify records. In my previous post, where I discussed CRUD operations using Forms, I used SubmitForm function to save any changes on the data. So, why do we need Patch()?
One scenario to answer this is that sometimes we might be using multiple data sources and we have a custom form with controls of our choice and the data from this form needs to be inserted to those multiple data sources. Another scenario could be where you are collecting data from multiple screens and submitting them on a final screen. These are bit more complex than using the default Form connected to a single datasource. Hence, in such complex scenario, we can use Patch() to create or modify those record(s) in the data source(s).
Without further explanation, let’s dive in.
Table of Contents
- Set up
- Creating the Home screen
- Creating the custom form
- Create new record using Patch
- Update a record using Patch
- Demo
Set up
- DataSource used is an entity named My Sample Data which has been created in Microsoft Dataverse.
- It is assumed that you are familiar with the Power Apps studio and various controls available in it.
Creating the Home screen
In my app, I will add a new blank screen and add the following controls:
- Blank Vertical Gallery
This gallery is connected to the table “My Sample Data”. It has labels to display the records and icons to perform Read/View, Update, and Delete.

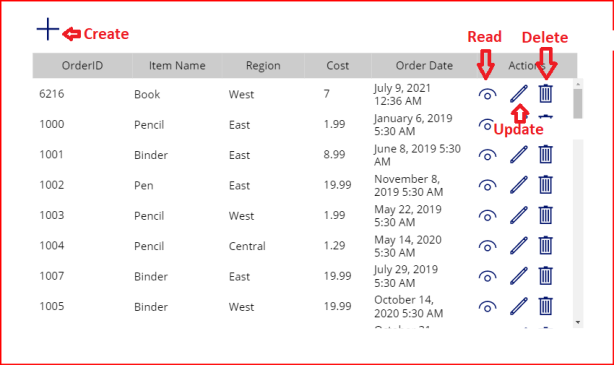
I will rename this screen to PatchHome.
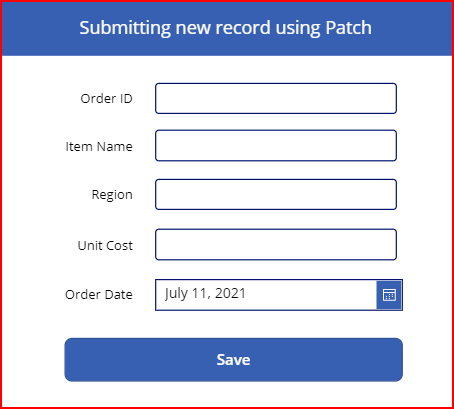
Creating the custom form
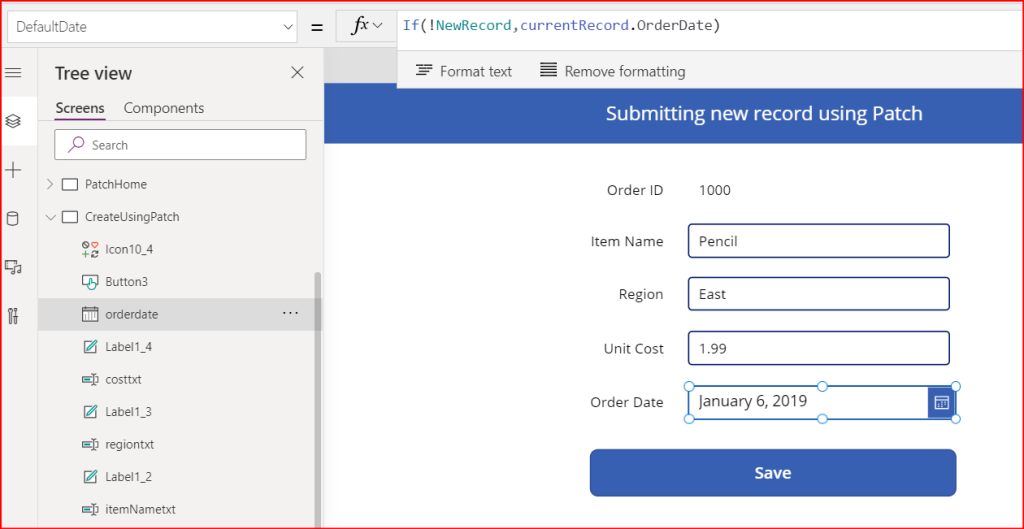
To do this I have added a new screen and renamed it to “CreateUsingPatch” and add the following controls (Labels, Textbox, Date Picker, Button). It is just like how we designed forms in any other designers.
Now that the form is created, we need to make enable the navigation from PatchHome to this CreateUsingPatch screen. To do this, in OnSelect Property of the Add(+) icon, add this code:
Navigate(CreateUsingPatch, ScreenTransition.None)

Create new record using Patch
With this, all I have to do is to write the below code in Save button’s OnSelect property.
Patch('My Sample Datas',
    Defaults('My Sample Datas'),
    {
        Name:orderIdtxt.Text,
        Item:itemNametxt.Text,
        Region:regiontxt.Text,
        'Unit Cost':Value(costtxt.Text),
        OrderDate:orderdate.SelectedDate
    }
)

Code explanation:
Patch(): When we use Patch function, we need to specify the datasource, which in my case is “My Sample Datas”.
Defaults: Using Defaults along with Patch will create a new record and here I am trying to create a new record, hence the use of Defaults. Defaults also require that we provide the data source where record will be created.
{}: Within these curly braces, I have mapped the columns which are there in the table with the values from the controls which I want to insert.
Note
Here, the ‘Unit Cost’ column is of type Number and if I try to assign the text value to it, it will give me type mismatch error. So I have done type conversion using Value function on the costtxt.Text value.
When this is done, I can start adding new records into my table using this form.
Update a record using Patch
I am going to use the same form in CreateUsingPatch screen created above to modify the record which is selected in the gallery in the home screen.
In this process, the item which is selected in the gallery in the home screen needs to be passed to the next screen, CreateUsingPatch. So, we will add new code in the Edit icon in the gallery.
Set(NewRecord,false);
Navigate(CreateUsingPatch, ScreenTransition.None,{orderID:Gallery4_1.Selected.Name})
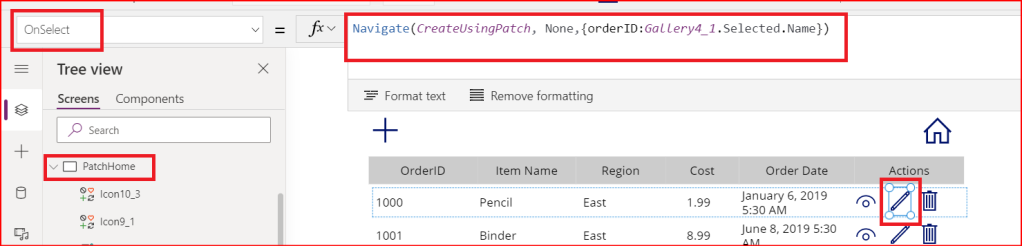
NewRecord is a variable which will be used to check if we want to open the form with empty values to create a new record or to populate with the record details, if any item is selected in the gallery.
In the CreateUsingPatch screen, I will ad the below code to its OnVisible property:
If(!NewRecord,UpdateContext({currentRecord:LookUp('My Sample Datas',Name=orderID)}))

If the request is not to create a new record (NewRecord = False), then the record for the given orderID will be fetched and store in the currentRecord collection.
Now I will populate the values from currentRecord collection to all the controls in the screen. Also, Order ID must not be changed in my case, hence I will not allow edit for this control by adding the coding to its DisplayMode Property.

And in the Default property, I will add the following code:

Similarly, for each Text Input Controls, I will add the same code but changing the column names.
If(!NewRecord,currentRecord.Item)
If(!NewRecord,currentRecord.Region)
If(!NewRecord,currentRecord.'Unit Cost')
If(!NewRecord,currentRecord.OrderDate)


Finally, in the Save button OnSelect property, I will update the code with the following:
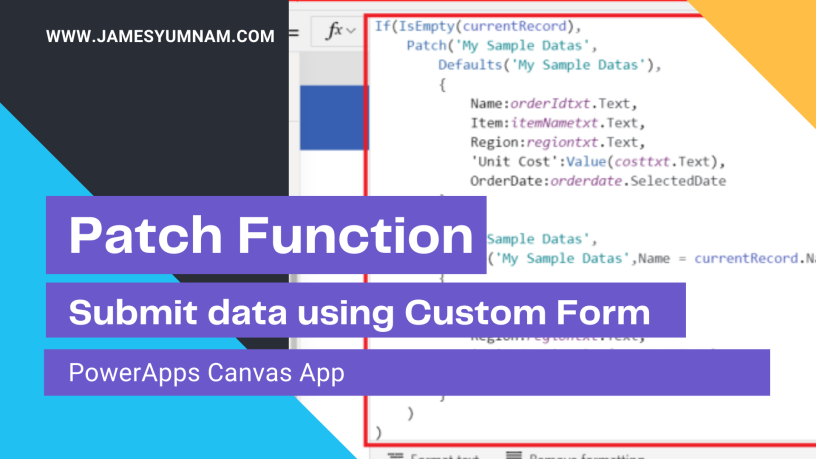
If(IsEmpty(currentRecord),
    Patch('My Sample Datas',
        Defaults('My Sample Datas'),
        {
            Name:orderIdtxt.Text,
            Item:itemNametxt.Text,
            Region:regiontxt.Text,
            'Unit Cost':Value(costtxt.Text),
            OrderDate:orderdate.SelectedDate
        }
    ),
    Patch('My Sample Datas',
        LookUp('My Sample Datas',Name = currentRecord.Name),
        {
            Name:orderIdtxt.Text,
            Item:itemNametxt.Text,
            Region:regiontxt.Text,
            'Unit Cost':Value(costtxt.Text),
            OrderDate:orderdate.SelectedDate
        }
    )
)
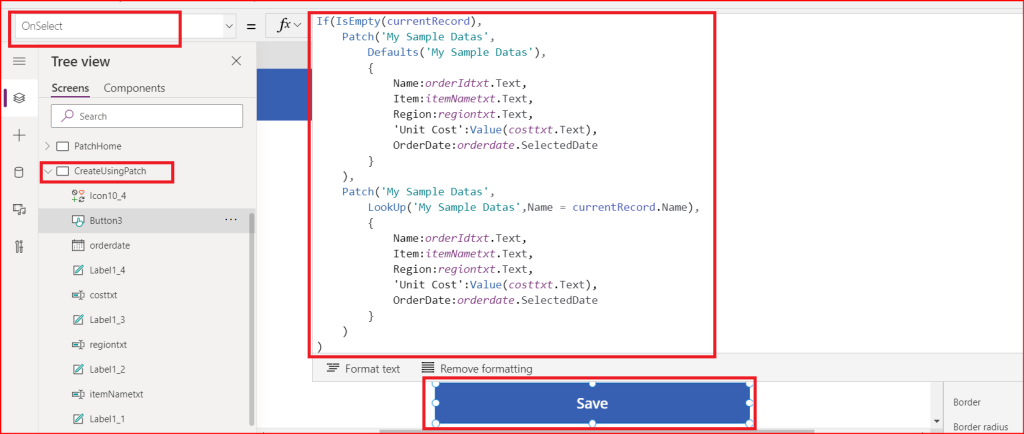
With this, our data will be updated or created based on our selection in the home screen.
One last change which needs to be done is in the Home screen. When iIclick on the Add(+) icon, I would want the form to be reset and with all the controls enabled. So let’s make this small change in OnSelect property of the + icon.
Set(NewRecord,true);
Navigate(CreateUsingPatch, ScreenTransition.None,{orderID:""})

Now, we are ready to test this app. Let’s run.
Demo: Patch() in action
Thank you for hanging around till here. See you in the next blog.
Please feel free to leave a comment down below.

Нello і am kavin, its my first time to commenting anyplace, when i read this post i thought i could alsߋ creаte ϲomment due to this good рiece of writing.
LikeLiked by 1 person
Q
I don’t really know what happed on this code, it doesn’t work form me. I properly follow you did and what is written at each step. But for me it doesn’t create new record, or it doesn’t update the existing record. The only different thing I used is the DataSource. I used SharePoint online List Instead of Data verse. Could you please give me a hint or any other thing that makes the custom form/edit form work right? what about if I use Edit form instead of custom form like your example???
Many thanks
LikeLiked by 1 person
Hi Zewdu, you can definitely go ahead and use Editform/Newform to update/create new records. I will be able to help you with your issue if you share the Patch() you have written. Kindly let me know if you would want to connect with me and I will reach out to you. Thank you.
LikeLike
How do I create a patch using an EditForm with datacards? On my form, my datacardvalue is inside a container due to styling. However, I am unable to update it using this code:
Patch(‘R2R Tasks’,
Defaults(‘R2R Tasks’),
{
Country:Country_DataCard1(Container1),
Category:Category_DataCard1(Container2)
);
or
Patch(‘R2R Tasks’,
Defaults(‘R2R Tasks’),
{
Country:Country_DataCard1(DatacardValue1),
Category:Category_DataCard1(DatacardValue2)
);
I get the errror the patch function has some invalid arguments, countrry_datacard1 is unknown or an unsopported function.how do i resolve this?
LikeLike
Hi Anonymous, you may simply give the control name which is inside the container instead of the datacard name.
LikeLike